It’s time for the second part of the article about using Houdini in Unreal Engine presented at The Undead Dev. Also,
It’s time for the second part of the article about using Houdini in Unreal Engine presented at The Undead Dev. Also, take your time to read the first part in case you missed it.
Network View Nodes Cheat Sheet
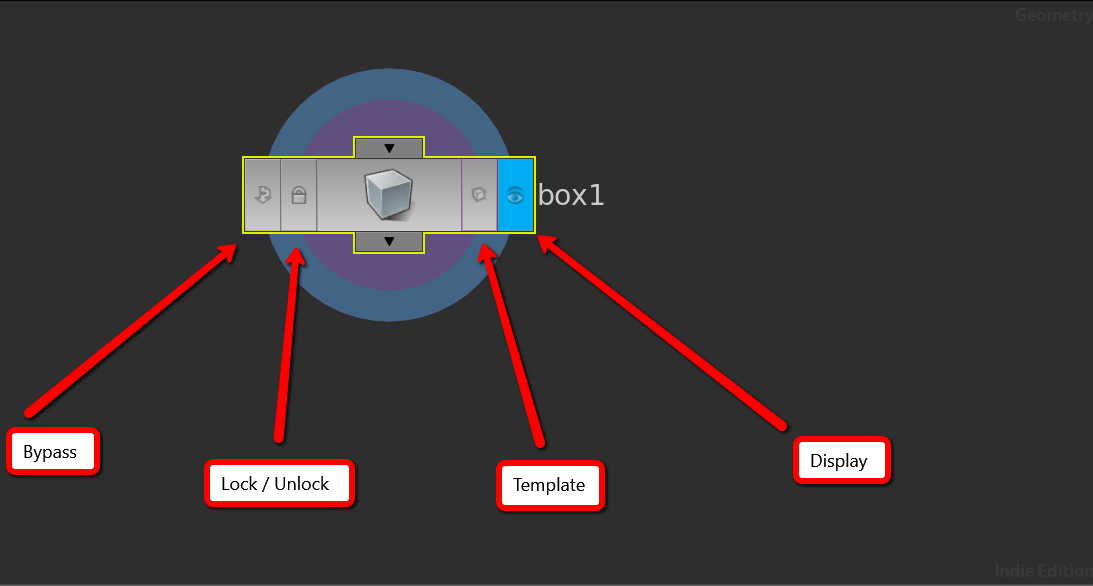
Most nodes have one or more inputs coming from the top, one output coming from the bottom, and four buttons along the face of the node. These buttons change how you interact with and display what’s available in the “View” and “Parameters” windows.
Bypass ignores all effects of this current node. Lock prevents you from making any changes to this node. Template forces this node’s output to be drawn to the view behind the actual output for the graph. This is really useful if you are trying to see a screenshot of the graph at a particular point compared with its current version. Finally there is the display button. The display button can only be active for one node at a time within a graph and designates that node as the output for the graph.
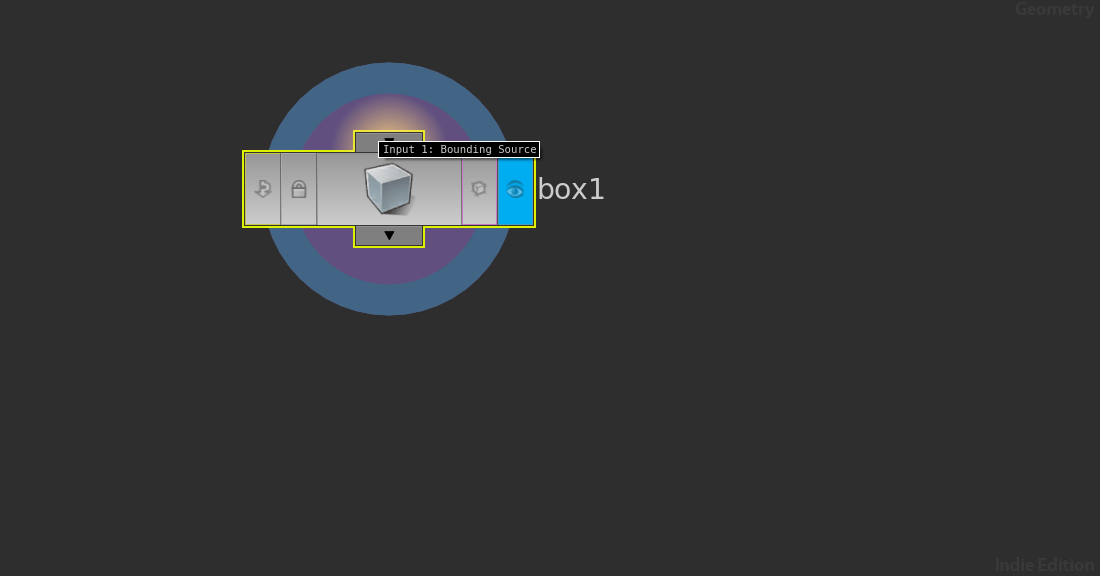
The amount of different nodes available for use can be overwhelming to a new user but Houdini does a good job of explaining as much as it can at each step if you know where to look. Confused about which input on a node does what? Just middle click on it and it will label it for you.
Want to know any of the stats for your graph at any one node? Just middle click the center of the node.
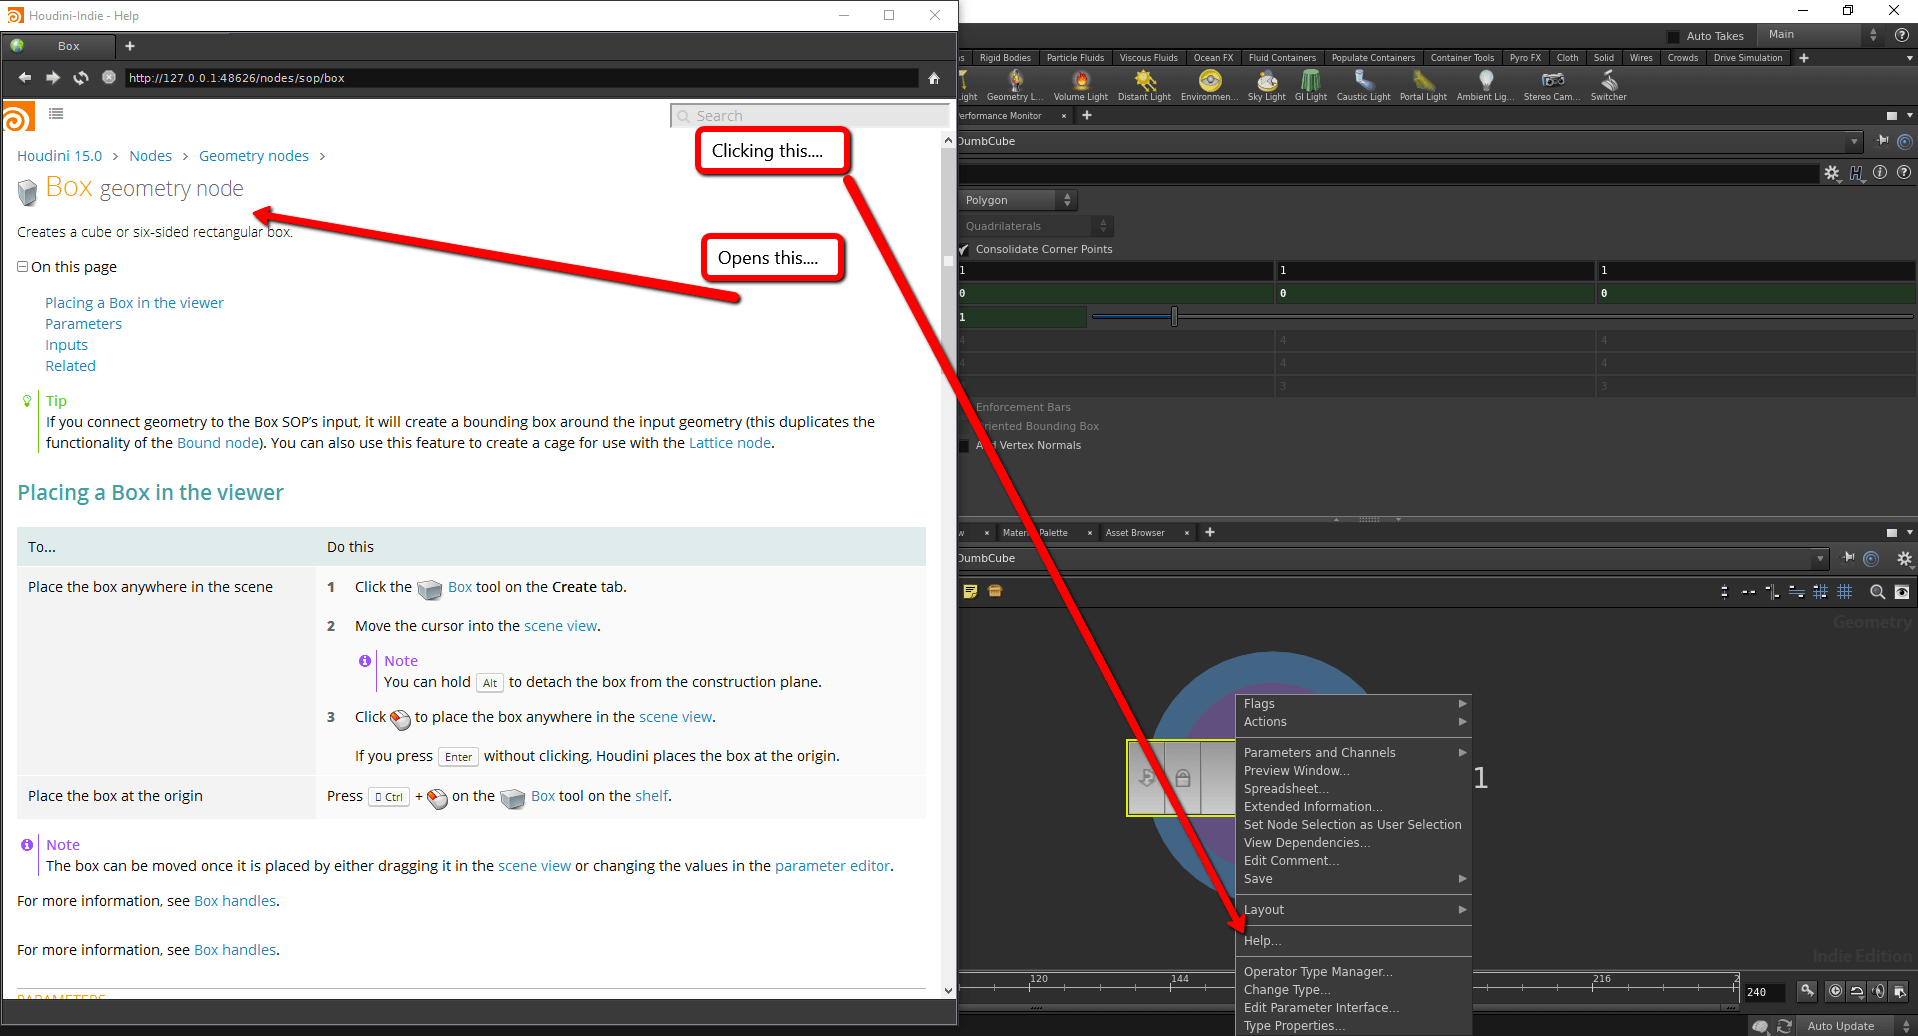
Confused about what a node does? Right click and select help and it will open up the documentation right in the app for you.
I might not be able to think of everything you guys might get stuck on trying to follow these tutorials, but if you use these resources hopefully you can dig yourselves out of any hole I accidentally lead you down.
Sweeping A Curve
One of the best parts about using Houdini with Unreal is the ability to draw a curve right in engine and have your geometry update immediately. Meaning you can now just draw walls, bridges, and corridors. Should you need to rearrange the level later due to play testing, just adjust the curve the geometry is using and you instantly have a new usable mesh. This kind of workflow allows you as a level designer to be way more iterative in your process. In order to do anything like that we need to know how to accept a curve from Unreal and how to sweep a shape across that curve.
1. Creating the geometry nodes – Let’s start by creating a new work-space. In it we’ll create two geometry nodes and delete the default geometry objects that Houdini creates in them the same way we did in Part 1 from last week.
Notice that I’ve already named these geometry nodes. One is named “DeafaultCurve” and the other “CurveSweep”. “CurveSweep” is the node we will eventually be making a digital asset out of and using in Unreal Engine. The purpose of this exercise is to sweep a curve coming into Houdini from Unreal, but in Houdini while we are creating the digital asset we don’t have access to the curve coming from Unreal. So how do we test that it’s working correctly? We just feed it a default curve temporarily from inside of Houdini itself.
2. Setting up the default curve – Go into the “DefaultCurve” geometry node and lay down a “Curve Node”. With the curve node selected click in the “View” window and then hit Enter. Clicking will now allow you to manually place points on the curve. When you’re done adding the points you need just hit escape to get out. Points automatically snap to the floor grid unless you hold shift. For this stuff I find it useful to turn on the floor grid so you get a better picture of what’s going on.
3. Adding the curve input parameter – So now we’ve created this random curve in one of our geometry nodes but we need to use that curve in the other node. We need to open up the ability to accept geometry from external sources within this Digital Asset. So first turn the “CurveSweep” geometry node into a digital asset using the same process I went over in part 1. Now, inside of the “CurveSweep” digital asset add an object merge node. This node will be our entry point for external geometry. Now open the parameters window for your digital asset and drag the “Object1” label from the object merge node’s parameters just under the root.
Click “Accept” and then go back to the root level of your network view. You’ll notice your “CurveSweep” digital asset now has a parameter for “Object1”. To pull the curve from “DefaultCurve” into “CurveSweep” we can just use the operator chooser dialog to the right of the parameter input.
4. Smoothing the curve – It’s unlikely that you’ll want a curve as rigid as the one you got by using the curve node. To smooth out this curve we are first going to convert it to a NURBS curve. There’s a good chance you might not know what that means (in which case I recommend a little light reading but basically it’s going to take our rigid curve and soften the hard angles. To do this just add a Convert node to the output of your object merge node. Set the “Convert To” to NURBS curve and and set the “U Order” down to 3 so that it’s not too loose.
I’ve turned on templating for the original curve so you can see the difference that adding this last node has made.
5. Resample the curve -So now we have a nice smooth curve to work with. Let’s give it some points for the sweep node to eventually work with. For this task I’m going to use a “Resample” node. I’m going to set the maximum length at about 28 just cause it looks good to me. This will divide our curve into equally spaced segments of your desired length.
6. Create the curve cross section – You can use any shape to sweep along your curve. For the purpose of this example I’m just going to use a simple circle. Go ahead and add a cicle node to your graph. Make sure to set the primitive type to “Polygon”. I set the uniform scale to .25 so it would fit the curve better. I also reduced the divisions in order to lower the amount of geometry this thing is going to produce. 7. Sweep the cross section along your curve – Now that you have both a curve and a cross section you can sweep the one across the other. It’s as simple as using a “Sweep” node and getting your inputs correct. As a matter of personal preference, I usually turn on “Angle Fix” from the sweep node’s parameters. It tends to give a more fluid sweep.
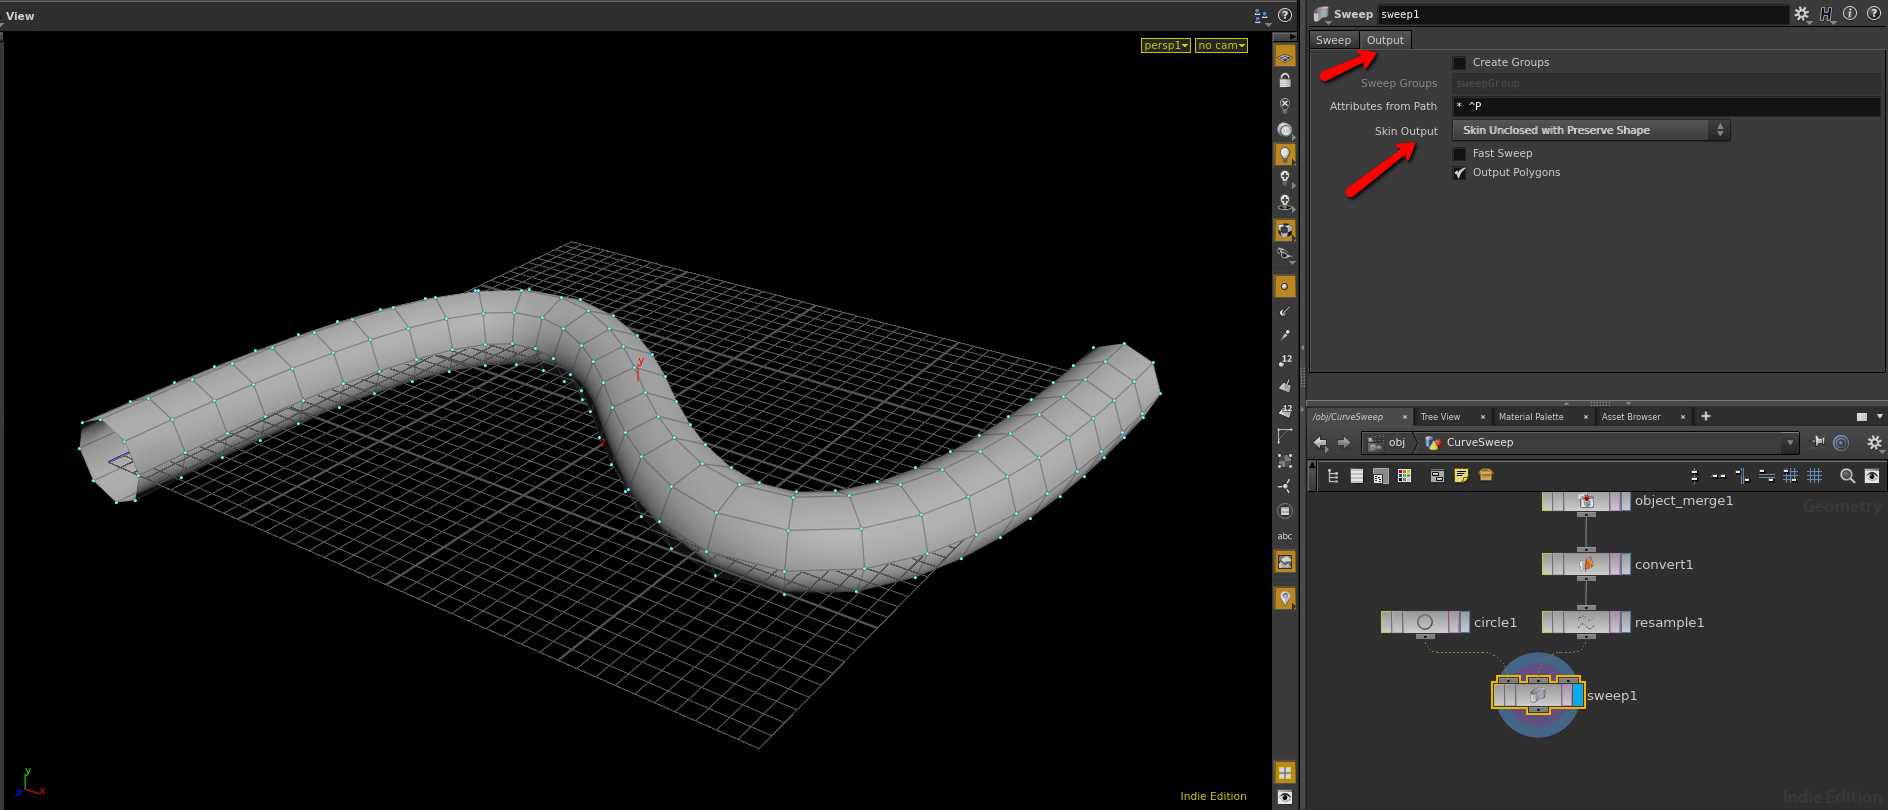
8. Skin your curve – There is a “Skin”node with a lot more options, but for our needs we can just use the output tab on the sweep node’s parameters to skin this thing. Set “Skin Output” to “Skin Unclosed with Preserve Shape”.
9. Manipulate in Unreal – So there you go. Save your Digital Asset and bring it into your game. You’ll notice that when you pull this one into your game, instead of getting a shape immediately, you get the Houdini Icon.
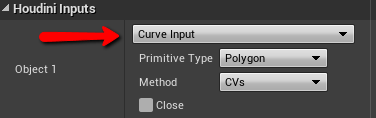
This is because our digital asset requires a curve and it doesn’t have one yet. To add a curve you just need to go to the Houdini inputs for your digital asset and set the geometry type to “Curve Input”.
Once you’ve done this you should see geometry and two control points that you can move around the map. As you move the control points the geometry should update update so that the control points remain connected by a tube. To add another point to your curve just right click any existing point and select “Add Control Point”…
…and there you go. It adds a control point to your curve so you can manipulate it as you like!
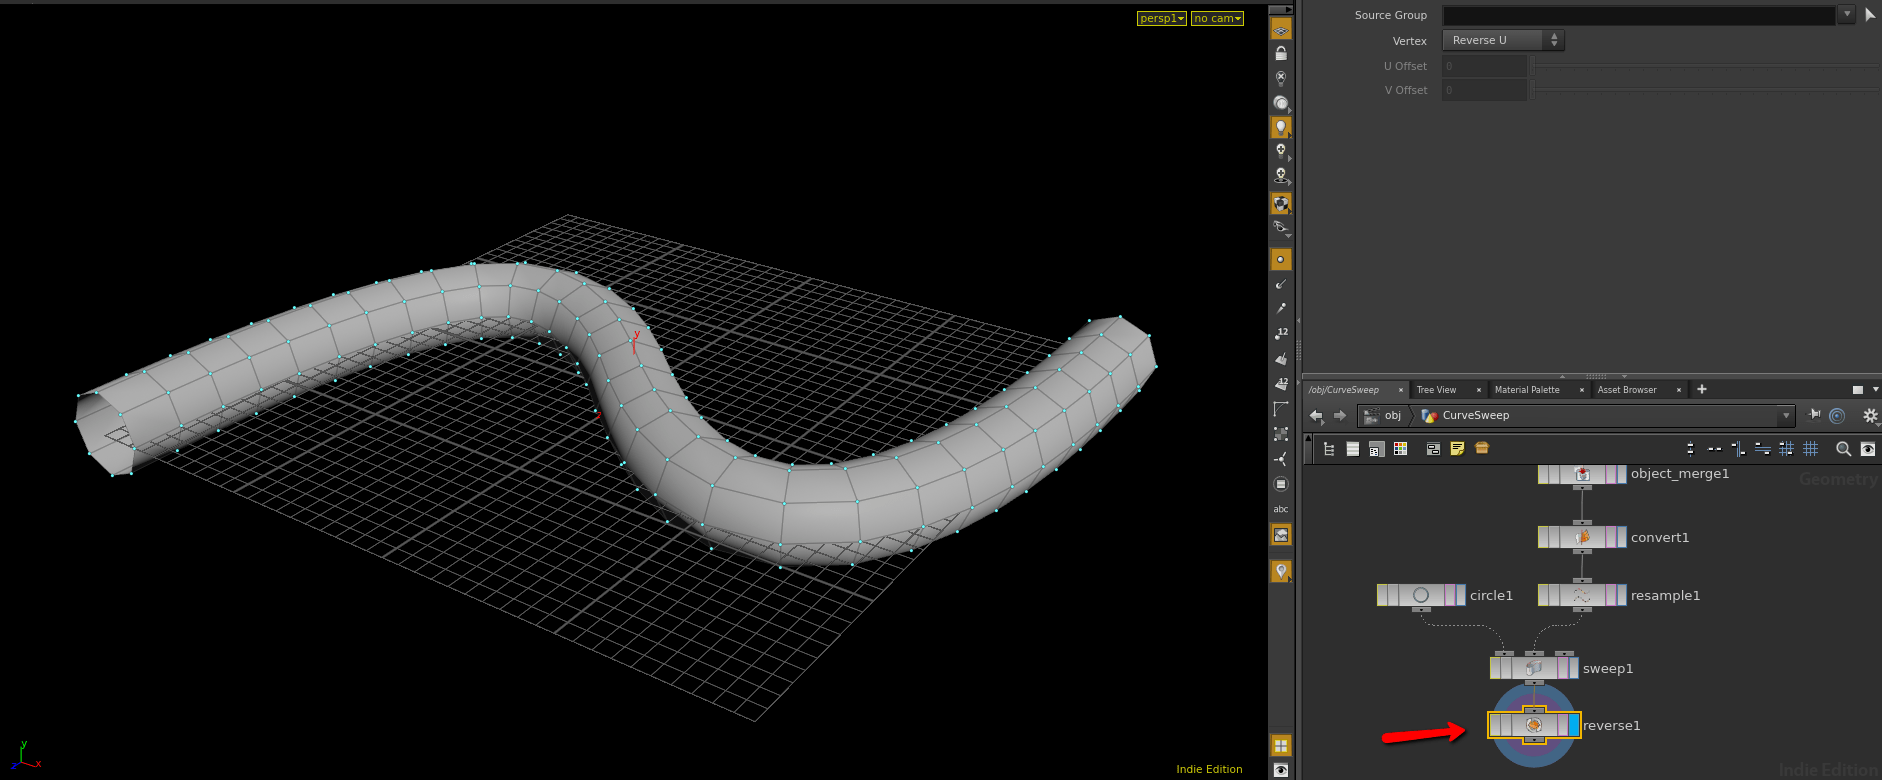
10. Fix your normals – So the more astute of you may have noticed that our sweeped curve is inside out…. These kind of things happen when you write tutorials at 2 A.M. But what doesn’t kill us makes us stronger and gives me a great excuse to show why this method of iterative development is so great. I don’t need to get rid of anything in my scene. I can just go back to Houdini fix the asset and rebuild it in Unreal.
The problem is that even though I’ve got all the geometry in correctly I never set any normals for any of it. So Unreal guessed at the normals and guessed incorrectly. There are a few different ways to correctly set the normals but those are for a future tutorial. For this one I’m just going to turn my graph inside out with a “Reverse” node so that when Unreal guesses my normals it gets it right this time.
If you save your digital asset and then click “Rebuild Asset” in Unreal, your curve should now be right side out!
Source: undeaddev