Guts: Sculpting & Texturing Realistic Skin Detail
Gerardo Torres Carrillo talked about his realistic fanart portrait Guts explaining how he worked on skin details, texturing, hair, and lighting.
In case you missed it
You might find these articles interesting
Introduction
My name is Gerardo Torres Carrillo, I’m a self-taught 3D Artist and I currently work at AMCO as a Multimedia Designer. I went to Cesun Universidad and studied Engineer in Multimedia, but it all started back when I was 12 years old. I went to the cinema with my father to watch Iron Man, the VFX in that movie blew me away, and right there I said to myself “one day I want to do that”.
I began by watching tutorials of how to do 3D intros for a YouTube channel that I had back then. For years I kept watching videos, reading magazines and VFX breakdowns, using any 3D software I could find to see which one I liked the most. Autodesk Maya turned out to be the winner. My first images were 3D models of vehicles I found and rendered, I knew how to model but it was something that I didn’t do that much back then until my 3D classes began at the university. That’s when I was forced to create my own stuff.
Guts: How It Started
Once, I watched a video about bosses from Bloodborne and the narrator talked about how Berserk was an inspiration for the creator; then in a different video I heard about Berserk again, and I thought - what is that? I searched for it and found out there was an anime which I then watched and fell in love with. Guts is the name of the protagonist. I had already done fan art before, of a game called Little Nightmares, so, I decided to do a piece inspired by Berserk. There is a lot of images of Guts, so finding references was not difficult at all. I mostly found images of his face, these 2 were my favorites and the most used ones:
This project began in late 2017 and has been through many iterations. One of the most important things I learned from it was that I needed to study anatomy.
Sculpting the Face
After I gathered the reference I used PureRef and organized everything in the corner of my monitor. In ZBrush, I began by using a male base mesh that I got from FlippedNormals.
From there, the process of trying to figure out how Guts looks to me began. I spent countless hours changing every part of the face, and also looking at the reference of real people, selecting parts of them, and sculpting. This project is pretty much a Frankenstein. The hardest part was the expression; it is not very complicated but it was tough to make it look realistic. Again, I was still learning anatomy while making this, so it was my practice.
For details like the scars, I used a brush called “Quick Semi-Scar” from the Double Action Brushes pack; for the rest of the details, I mainly used the DamStandard brush. Of all the brushes, my favorite and the most used one is the ClayBuildup brush.
Skin Detail
All the micro skin details are made with the help of the awesome displacement maps from TexturingXYZ. The maps come with different versions of detail in the RGB channels, 3 textures in one file. I used Mari to project them onto the mesh.
Based on mt previous work, I have one main rule I follow when I get to this stage: “Be careful with the scale”. It’s very easy to mess up this because you zoom and rotate the camera to paint, and you can change the size of the projection, so one part can end up with pores bigger than normal. Since at this point I already have the camera set up, I know what is visible and there’s no point in adding detail to the back of the head, for example, - you won’t be able to see it and there is hair on top. As soon as the necessary area is covered with the textures, you can move to the next stage.
UVs
If there is something that I don’t like and find tedious, it is redoing retopology. Thankfully, the base mesh I started with already had great topology but in the process of this version of the portrait, I messed up the UVs, so I had to re-do them. I did some quick cuts and divided the face into a bunch of pieces, it’s not the best was I imagine, but I had no problems with it. Since I knew I was aiming for close-ups, the textures for the face are 8K in resolution. For all the objects, I did the unwrapping part in Maya.
Hair
The hair was created inside Maya using XGen, a very easy tool to use. The character has a unique hairstyle seen in most of the drawings, so in order to transform it into something more realistic, so to speak, I kept guides similar to the reference. All of them end up in clumps, and the hairs at the forehead go forward. I did a smooth transition from front to back so that it didn't look too much like in the drawings. In the modifiers, I used 3 versions of clumping, 1 cut modifier to remove even length, and 3 different noise modifiers, the last one for stray hairs. For the eyebrows and eyelashes, I used similar modifiers: clumping, cut, and noise, not as complex as the hair.
Texturing
First, I set up the displacement; in this article from TexturingXYZ, you can find a really helpful script that sets up the displacement map for you. Once that’s done you just need to adjust the intensity of each channel (the values don’t go above 0.1, you don’t need that much).
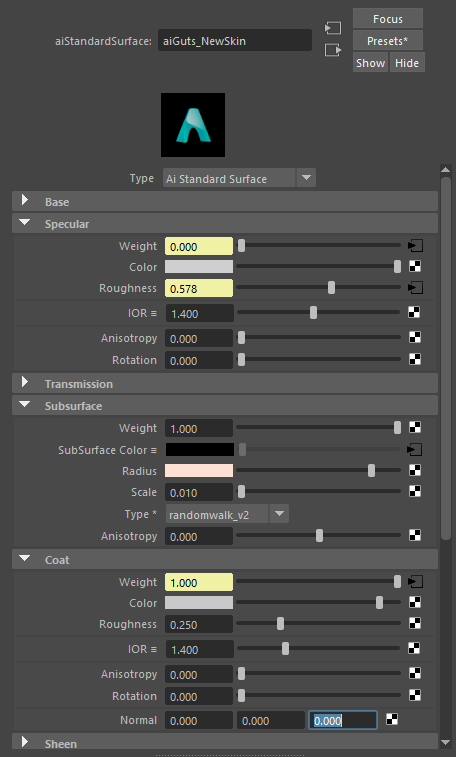
Now Subsurface, my favorite part. It gives the mesh that flesh-like quality to it. I first use the preset “Skin 2” that changes the “Radius” attribute. Then, I plug the color map to “Subsurface color” I previously painted in Mari, set the subsurface type to “randomwalk_v2”, open the Arnold Render View, and start rendering with progressive refinement and scale tweaking until I like the result. Both specular and coat are used here, weight and roughness use the red channel from the displacement map and are controlled by “remapValue” nodes. The coat intensity attribute uses the spec map from Mari. To this, I added the mask of the blood to control it there too.
The eye is divided into separate parts: the sclera, the iris, the lacrimal, and a piece of geo that simulates liquid between the eye and skin. The sclera has a ramp texture that controls how much of the iris is visible, the shader has subsurface on. The object representing the liquid has a noise bump map to make the reflection irregular. The rest of the objects were textures using Substance Painter, I just connected their textures in the correct spots and that’s it.
Adding Blood
The blood on the face was created inside Substance Painter using this smart material. It's really easy to use, I knew I had to buy it once I saw it on sale. When it is used, your object gets covered in blood and you just paint the mask to show it. I imagined the blood falling from the top of his head, some open cuts, etc. Once exported, it comes with the normal map that gives the blood bumps; that was something that helped a lot to achieve this look.
Lighting
Back at my university, I learned an important lesson: “everything you do has to be functional and understandable”. The way I use this is the following: I have a character here, I want to show it to people at some point; they need to be able to see what I want them to see, and what they see has to be simple to understand.
In the first image, the main light is on top of the character and a rim light is on the right side behind him. The first light shows the whole head, and the rim light is there to separate the character from the background. This also could have been done by adding a gradient or a different color behind him.
In the second image, the main focus of the image is on his face, especially his eye, so that part is the brightest. To separate the character from the background, the orange key light also hits the back wall and bounces off to illuminate part of his armor and hand. This was faked, I added 2 more lights to simulate that effect. I didn’t put any bright lights on the left since I didn't what them to draw too much attention. However, I also wanted that part to be visible, so, to contrast the orange on the right side, a blue light illuminates his hand, armor, sword, and face. The feeling I had in mind when making this version of the portrait was of him being inside a cave or something; it was inspired by one of the images I found while looking for lighting reference. Also, both versions have one light for eye reflections.
Gerardo Torres Carrillo, 3D Artist
Interview conducted by Arti Sergeev
Keep reading
You may find this article interesting