Jared Chavez discussed his The Last of Us fan art project Ellie's Bad Day: sculpting workflow in ZBrush, hand-painting, working with contrasts and ray-tracing denoising algorithm in Marmoset Toolbag 4, rendering, and more.
In case you missed it
You might find these articles interesting
Introduction
My name is Jared Chavez, I currently work as a Character Artist at Turtle Rock Studios on Back 4 Blood.
I grew up in Albuquerque, New Mexico, where I attended The University of New Mexico to get a degree in Interdisciplinary Film and Digital Media. Upon completion of my degree, I sought further knowledge attending CGMA courses while working as a 3D artist at Northrop Grumman. There I contributed to different projects revolving around VR and using it as a training tool for various purposes. While at Northrop, I also started my professional career with Dekogon creating props in my free time. After my time at Northrop, I moved to California to join Turtle Rock Studios.
Characters have always been my favorite thing to create since I was a kid. Characters are what you relate to, and the focus of people’s attention. As a kid, I remember watching Jurassic Park for the first time and being so in love with the dinosaurs and how they were made – that movie planted the seed of my wish to get into the entertainment industry.
Growing up, I never really had any idea about how to actually do that though. Luckily, my hometown had a film program and I was able to attend it and get a basic understanding of how films and games were made. I was also introduced to 3D and Maya in particular. Right from that moment, I knew I wanted to make characters. It wasn’t until my sophomore year of college that one of my friends told me to look into this software called ZBrush. When I checked it out and saw how things were created in it, I knew it was the tool I needed to learn. I spent the rest of my time in college self-studying and trying to piece together how to become a character artist.
Ellie's Bad Day: Concept and Goals
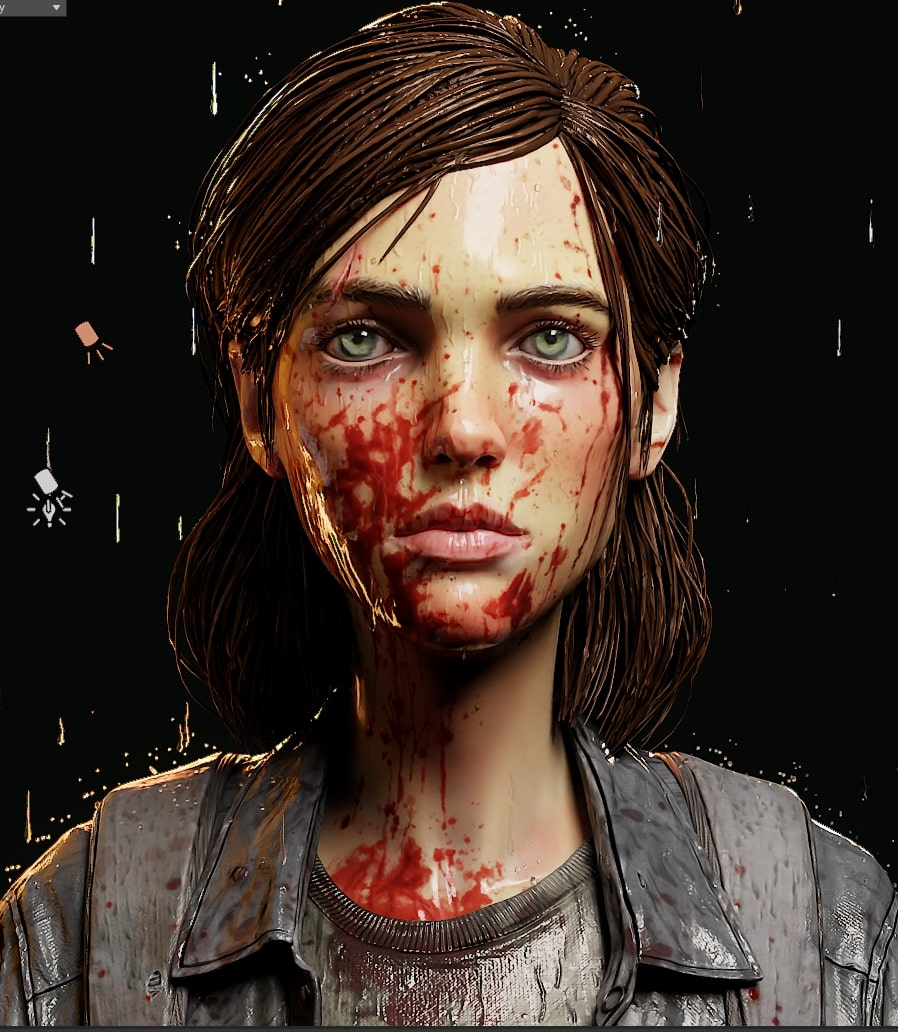
I am a massive The Last of Us fan. The first game came out when I was starting to learn 3D, and the ZBrush sculpts they showed after the game release was a huge inspiration for me. I still find myself looking at those characters because they were done that well. After seeing those sculpts, I made a character inspired by the game, but to put it straight, that model was horrible. So with the second game coming out in 2020, I decided I wanted to have a do-over and make something that would redeem that horrendous first attempt.
Right around the time when I was trying to figure out what exactly I wanted to make, a couple of concepts were posted on ArtStation. One was of Joel and the other of Ellie. The concept of Ellie was a piece by Chloe Veillard, and it really stuck out to me. There was emotion in the look, the graphic shapes, the mood, and the blood – all things I really wanted to try and capture in a 3D version.
When it comes to personal work, I usually try to make a character that is going to challenge me, allow me to learn something new, and push me out of my comfort zone. This concept hit those criteria. My skill set mostly consists of more realistic characters so this concept was something different and I really wanted to try and do something interesting with it.
Sculpting the Head and First Clothing Pass
The workflow for the character was pretty straightforward. To save time, I tend to start from a base mesh, and for this project, I took a head I already had and began from that. The rest of the assets all started out as sketches.
I first blocked out some simple shapes to capture the assets I needed. Once I had those pieces done, I moved to the clothes and completed them first. The workflow was to sculpt the blockout to get the basic shape of the shirts and backpack, then mask out the pattern and extrude a mesh from that. Then, I would delete the back faces so I only had a single-faced piece of geo. Next, I would use ZRemesher to get a cleaner topo to sculpt on. To make the fold, I used the clay spin brush. Once I had the folds and the mesh looked good, I used the panel loops to extrude and add thickness. I find this to be a pretty quick and easy solution for cloth as I don’t have to ever leave ZBrush.
For the face, the sculpting process was straightforward as well. Most of it just came down to finding the shapes that looked right and conveyed the emotion of the piece. What really caught my attention in the concept was the eyes, so I wanted to focus on them and convey that emotion in them.
When it comes to working in ZBrush, I like to keep things simple. I wouldn’t say I use a lot of crazy stuff in terms of workflows or tools. Occasionally, I try to take advantage of new techniques that may benefit the project I’m doing. Same goes with brushes. I keep things pretty straightforward. I mostly stick to the standard brush, move, clay tubes, dam standard, smooth, and the out-of-the-box clay spin brush. One thing I try to focus on working only inside ZBrush or leaving it as little as possible. It’s much easier to manage a project if you’re not trying to juggle assets between programs.
Defining Clothes and Accessories
The outfits and accessories follow my usual workflow of blocking out shapes quickly, then masking objects to separate elements and give actual thickness.
Some of the accessories posed challenges in regards to time – for example, the knife and bracelet. I knew that I could put together both of them in a secondary modeling package, and I used Maya for it. The advantage of doing these in a traditional modeling package was that it allowed me to create mid poly assets that I could make UVs for and use for rendering. Also, this method allowed me to quickly create subdivided meshes for the high poly. When making assets, I try to keep things like this in mind to work less destructively.
As I stated before, when approaching characters I tend to stick to ZBrush as much as I can. I prefer a more handcrafted approach to making my assets even if it means spending a little more time on the process. In this project, this mostly applied to the cloth assets. All the clothing was sculpted by hand. I find it a bit more fun and somewhat more challenging. Marvelous Designer is great, but doing it by hand feels more true to me.
One problem that exists in game art is the limitations of no UDIMs. In personal projects, you aren’t necessarily as limited to texture sets so you can make up for part of that restriction by using more sets, however, lack of UDIMs does prevent artists from getting ultra-crisp details. Luckily, the use of tiling detail normals can help compensate for that. The use of tiling detail normals also allows me to have more control over the final piece and save time by not having to bake any of the detail into the sculpt. The latter can be great but the bake quality can degrade; using a tile normal provides ultra-crisp detail that you can keep zooming in on.
UVs
For this project, I didn't want to focus on the technical aspects like retopo too much. Most of the meshes were made using ZRemesher, the process was quick and dirty. When it came to UVs, I had to be a little more precise with my choices. I am quite familiar with the tools in Maya, and that is my software of choice. Since I knew I wanted to rely on detail normals for things like the shirts and backpack, the patterns needed to be laid out in a correct way for stitches not to be skewed.
Texturing
Texturing for this piece was the most exciting part. The concept had such a graphic look and shapes to it and I really wanted to convey that stylized feeling with my textures and render style. It took me some time to bring the piece together.
First, I started with guiding the viewer where to look. The areas I wanted to focus attention on was the face, the right hand, and the knife, in that order. To reinforce this, I used light-dark gradients and contrast in colors.
The shirts and backpack were less important, so for both of these assets, I used a darker value and a muted saturation to draw less attention to them. Making the fabric read as wet and pushing the story of the scene with rain was an easy solution that helped me create contrast between the skin and cloth materials. Although I wanted less focus on those parts, the variation of roughness allowed me to still keep the area interesting to look at.
The skin used the same logic as the cloth. With the blood, I was aiming to create graphic shapes as well as color contrast that would really catch the eye.
Preparing the Renders
When rendering this project I was asked to be part of the alpha testing group for Marmoset Toolbag 4. For those who don’t know, the big box feature of this release is the implementation of ray-tracing. So from the get-go, the rendering stage involved a lot of exploring. In previous projects, I have been looking for ways to express a little more graphic take on my work. This project used some of those methods along with a few newer methods that came from my workflow in Toolbag.
The first of these methods involves going rather heavy-handedly on applying the sharpening filter to the image. Using this really helped me to bring out more details and define the colors.
The next technique was part of my experiments and involved using Marmoset Toolbag's ray-tracing denoising algorithm to blur and smudge the strokes around. This created the brushstroke effect and then was reinforced by the sharpening processed on top of the image.
Finally, the image was brought together with some editing in Photoshop to add the outline and make final adjustments.
Lighting was rather simple, I used a 3-point lighting setup with a main key light, an orange rim, and a fill light. I added a few extra fills to get some lights in areas I wanted to reinforce a bit more. When setting up lighting, I mostly stick to spot lights and adjust their size and softness to get the look I’m going for.
The backdrop for this character was a happy accident. I thought that rain would make this piece more interesting, so I created some quick sphere splashes to place on the model and create the illusion of rain hitting the surface. I also created spheres with tails that looked more like falling rain. I placed a layer of these behind and in front of the model and used some heavy DOF to help sell the effect as a whole.
Challenges and Conclusion
The most challenging aspect of this project was definitely the stylized look. It took a lot of trial and error to test things and come up with a workflow and look I liked.
With this project, I learned a ton. It really was a lesson in just using the tools I knew and thinking outside the box. Don’t restrict yourself to using the tool in a zero-to-one way. I highly doubt that Marmoset released that ray-tracing denoiser and thought “hey, someone’s gonna use this to degrade the quality of the image to create a certain effect”. So in the end, it was a good exercise to figure how to use a tool in a way different from what it was truly designed for.
Jared Chavez, Character Artist
Interview conducted by Arti Sergeev
Keep reading
You may find this article interesting